Wesley specialises in giclee fine art printmaking and art reproduction work. He is a Master Printer and founder of Giclee Art Sdn Bhd in Malaysia.
His business endeavor takes him through an exciting journey in photography dating back to 2005. Wesley primarily started in digital photography over a decade ago and he seeks to reproduce what he sees from captured in print. In his quest for a better print, he constantly seeks out suitable camera systems which can fulfill the technical requirements for his printmaking work.
Incidentally, Wesley’s printmaking endeavor started with ILFORD, with his paper of choice being the ever popular Ilford Galerie Smooth Pearl product, on his first large format printer the Epson Stylus Pro 4000.
Choosing the right paper for your image makes all the difference in the final presentation, and this is one of the reasons why partnering with Ilford has given him the unprecedented advantage in both quality and prestige in printing with his clients.
Wesley is also an X-Rite Coloratti Master, the first Southeast Asia EIZO Ambassador, a Profoto Premium Club Trainer and Sigma Camera Key Opinion Leader.
His profound knowledge in digital photography, color management and digital printmaking has made him as one of the most sought after trainers in his region and he regularly conducts live demonstrations, to teach the art of from “Capture to Print” including the techniques required for high quality art reproduction.
This is probably the last test and review of a wide angle solution for the H. The new Sigma 12-24mm F4 DG HSM | Art is a completely redesigned lens which claimed to have the largest piece of glass-molded aspherical element ever used on a lens, with the promise of near distortion free and excellent optical performance throughout the frame. This is a full frame lens, and when used on both the sd Quattro and Quattro H, it will produce an angle of view similar to 18-36mm (on APS-C) and approximately 16-31mm (on APS-H) respectively. The aperture remains constant at F4.0 regardless of the sensor size it is being used on.
The dp0 Quattro has been my reference ultra-wide angle solution for more than two years, and it remains one of the best solution without much compromise at a reasonable cost. It is perfectly matched to the Foveon Quattro sensor (1.5x APS-C) in a small form factor. It is the only dp Quattro with the largest aperture of F4.0 which is not a deal breaker given the fact that it uses ultra wide angle which already has the advantage of deeper depth of field at any given aperture compare to a full frame camera system. If you have read my other reviews, there isn’t an ideal ultra wide solution for the sd Quattro H….not until the arrival of this lens.
I did some comparison tests based on real world images, between the dp0 Quattro, sd Q (simulated by turning on DC Crop Mode) and sd QH (the “H”). The results are rather interesting, not something I would expect. Let’s have a look at the first test image:
Test #01 (dp0 Quattro vs sd Quattro + 12-24 Art @ 14mm, both at F5.6):
There is a slight warm cast on the dp0Q image although both are set to Daylight WB. It can also be attributed to the color rendition of the 12-24 Art lens which renders it slightly cooler. Which is more accurate? Neither, because both cameras aren’t profiled, which is not important in this comparison, nonetheless interesting to note.
Center resolution is neck to neck, there’s very little to separate the two.
The corners are softer on the dp0Q.
CA is more pronounced on edges of high contrast on the dp0Q
Pronounced chromatic aberration on the dp0Q. Much less on the sd Q + 12-24 Art lens.Optical performance at right bottom corner. dp0Q (left), sd Q (center), H (right)Top right corner. dp0Q (left), sd Q (center), H (right). Again, the CA is very pronounced on the dp0Q but is almost completely absent from the 12-24 Art.
Test 02, Resolution (dp0Q vs H):
In this test, I had to do match the exposure of both images and down size H image to match the dp0Q resolution (5424 x 3616).
dp0Q, Test 02sd Quattro H + 12-24 Art, downsized to match dp0Q resolution.
The resolving power at the center of the frame is excellent on both cameras although the 30% resolution advantage on the H is pretty obvious.
Left : dp0Q, Right : H + 12-24 Art. The leaves on the trees are better defined on the H image.
The optical performance at the corners are way better on the H + 12-24 Art:
Test 02: Bottom left corner of the frame.Test 02: Bottom right corner of the frame.
It is obvious that the Sigma 12-24 F4 Art lens performs very well on the H. The optical performance is very consistent across the frame, with negligible issue of CA compare to the already excellent dp0Q. Both exhibits near zero distortion in any real world images. The one major advantage the dp0Q has over the elder sibling is the ability to use screw-in filters and at 58mm, the cost of filters are way cheaper and can be easily purchased. The 12-24 Art requires a special filter adapter, and as far as I know only NiSi has a ready solution at the moment, which holds 150mm panel filters which are costly.
For those who are using the sd Q body (APS-C), the better choice is the 8-16mm which is nearly less than half the price of the 12-24 Art without making any major compromises in terms of optical quality and performance although usage of filters is virtually impossible.
To summarize my findings and test results on ultra-wide angle solutions, kindly refer to the chart below:
*The tests on the H should have been stopped down by a further 0.5-stop in Aperture value to match the depth of field of the APS-C sensor. My bad….
At the time of writing, I have yet to receive the demo unit of the newly launched Sigma 12-24mm F4.0 DG HSM | Art, so many would wonder how this lens performs on the sd Quattro H with the larger APS-H sized sensor. It certainly performs admirably on the sd Quattro (APS-C) without a single doubt with center resolution and sharpness exceeding even some of the primes available today. Corner sharpness on APS-C is very good, which matches to the center from F2.8 onwards, although it is still acceptable at wide open. It all depends on the subject on which this lens is used on. It is acceptable for corner performance to degrade slightly (with a tad of vignette) for portraiture work. For landscape, I would prefer to use it at F4.0-5.6 or even to F8 if a deeper depth of field is required. The MTF chart peaks at this range of apertures.
Even when the lens is used on the H without turning on DC Crop, the center resolution and sharpness are simply amazing! Before I go deeper into that, let’s compare how the rendering differs between the APS-C and APS-H when the field of view is matched :
APS-C vs APS-H with matched field of view on the same lens
At a glance it does seem that the H renders the image with less barrel distortion. This is true as it uses 21mm to produce a field of view of 28mm vs 18mm required on the APS-C. Interesting isn’t it?
If the same focal length is used, the resulting image on both sensors will be as below (simulated with DC Crop Off and On):
Field of view on same focal length between APS-C and APS-H
Let’s move on…
I just mentioned that the lens performs flawlessly in the center or rather across 60% of the frame. It can definitely out-resolve the H sensor, although it is kind of expected because the size of the sensels on both the Foveon (APS-C and APS-H) are essentially the same. However, one would gain much from the better resolving power on the H when the frame and field of view are similar due to the 30% increased in megapixels.
Perhaps the issue at hand which concerns us is how this lens performs at the corners. Well, it is not too pretty neither is it bad. The chromatic aberration and fringing can yield its ugly head when the contrast is high.
Chromatic aberration
Sigma Photo Pro is able to mitigate or at times completely eliminate this by turning on :
CA Correction >> Lens Profile (may need to set it higher than 1.0 for severe cases)
Fringe Correction, activating both Green and Magenta correction
The settings are straight forward and are usually sufficient to perform the correction.
CA Corrected
In more severe cases, I would prefer to retouch them manually in Photoshop or Lightroom.
Before and after CA removal
Corner sharpness degrades visibly because the APS-H sensor occupies a larger part of image circle projected by the lens. This is not a fault by design as the lens is not rated for use on the sd Quattro H, at least not something Sigma would recommend to use on the H. A much better choice is definitely the new 12-24 F4 Art which covers a full frame sensor. Please feel free to download the file below:
Please click to download the original file before any correction was made.
Redeveloped with the following adjustments in Sigma Photo Pro:
CA Correction & Fringe Correction
Luminance & Color Noise Reduction minimum (left-most setting)
Detail + 2 (to try and compensate for the reduced sharpness at the corners)
Corrected image. Please click to download.
There are indeed improvements as the focal length increases. I leave it to you to draw your own conclusions.
The Sigma 8-16mm is a legendary lens. It is almost a magical act for Sigma to design and actually produce something as wide that covers the APS-C sensor. This is not a fisheye zoom lens. It has a rectilinear projection which is almost free of distortion (much visibly less than the 10-20mm). The liberal use of exotic glass elements on this lens further improve its optical performance, even when used on the sd Quattro. Just how well this lens performs on the H….let’s take a closer look:
It has noticeable vignetting at 8mm and 9mm which is caused by the non-removable metal hood but it is almost completely gone at 10mm onwards. I am half suspecting, if the metal hood can be removed (although I am not going to do it on my lens) it may actually be usable! 10mm on the H is equivalent to the angle of view produced by a 13mm lens. While one may argue that using it with DC Crop Mode (on) may actually eliminate all the key issues here and gaining 1mm wider, but the 30% increase in megapixel on the same angle of view is too hard to ignore.
Center performance is excellent at all focal lengths of the zoom range, but the edges are slightly soft with a rather pronounced chromatic aberration. Your acceptance level may vary, but to a certain extend it is quite acceptable. Chromatic aberration can easily be removed in post processing.
10mm, F8.0. Click to view at 100%
16mm, F8.0. Click to view at 100%
I shall be adding more test images here from time to time.
The new Sigma Photo Pro 6.5 software has also received a major overhaul. Summarizing from the official website, here are the major improvements:
Compatible with macOS Sierra.
It is compatible with RAW data (X3F files, X3I files) of the sd Quattro H.
It increases the processing speed of RAW data in the Review Window and when it saves images, by utilizing the GPU (Graphics Processing Unit) (RAW data of sd Quattro series and dp Quattro series only).
It is compatible with thumbnails and shooting information of DNG files shot with the sd Quattro H (If the files are edited using other processing software compatible with DNG files, they will not be displayed).
It has an improved algorithm in Super Fine Detail Mode so that minor gaps between each frame are less visible.
It has an improved algorithm in noise reduction when developing RAW data for the sd Quattro series and dp Quattro series.
It has an updated Auto development algorithm of RAW data adjustment setting for the sd Quattro series and dp Quattro series.
It corrects the phenomenon whereby the parameter of Auto development is different when Display Quality or Display Speed is prioritized.
Preference Settings incorporates a mode whereby images transferred from Sigma Capture Pro will not open in the Review Window.
It incorporates an Update Information Notification function.
It displays messages for some functions by way of a pop-up notification.
Some might not have noticed, but the following pre-requisite is important for Windows Users:
If you have Windows 7 (64-bit) or Windows 8 (64-bit) installed on your computer, please install Windows Update Program (KB2929755) for x64-based system prior to SIGMA Photo Pro 6.5.0 installation. Please download Windows Update program (KB2929755) at Microsoft Windows Download Center if you need to download manually and install SIGMA Photo Pro 6.5.0 after finishing the system update.
It is also important that you update your Graphic Driver to the latest before installing the program.
Sigma Photo Pro is actually a fairly straight forward and easy to use proprietary RAW converter for Sigma cameras. It is probably the only converter (prior to the H and subsequent firmware update to enable RAW support in DNG) that is able to process the X3F/X3I files. The biggest complaint has been the the stability of the software especially on Mac OS X, and the awfully slow processing time to convert one image. This new version supports GPU acceleration and there is indeed a major improvement in response time when adjustments are made in the Review window.
SPP 6.5 – Preference Settings – Memory and GPU Acceleration are OFF by default.
Review Screen
I have been mucking around with it for a couple of days since it’s availability on 19th Dec. These are the list of improvements I noticed, and they reacted also instantaneously:
Detail
Tonal Adjustments
White Balance Setting
Color Mode
Highlight Control
Chromatic Aberration Correction
Fringe Correction
Color to Monochrome (vice versa)
In case you’re wondering, I am running it on my 6 year old Sony Vaio Z (Core i7 M 620 @ 2.67Ghz “Sandy Bridge”, 8GB RAM, 4x60GB SSD in RAID 0, Nvidia GT330m, 13″ FullHD LCD screen). Tested it on a 6th Gen “Skylake” Core i5 machine; it runs at least twice faster even with the standard Intel HD520 GPU.
Enable Display Quality Check (Horizontal). The fastest way to check image quality at 100% in SPP.
You may have noticed that the Aspect Ratio drop down menu now has native ratio (in APS-H only) and DC Crop mode.
DC Crop Mode Setting in the sd Quattro HDC Crop Mode in SPP 6.5
Any RAW image shot on the H can now be cropped (switching from 1.3X crop to 1.5X) by changing the mode correspondingly. It only works one way. If the image was shot with DC Crop OFF, it can still choose the DC Crop version in SPP. This is particularly useful if you are shooting with DG (full frame) lenses, but it might be rather confusing initially. As long as you have shot it in RAW with DC Crop OFF you will have the option to change it in SPP 6.5.
DC Crop Off/On
In summary:
DC Crop OFF captures at 1.3 x focal length at full native resolution of 25.5MP.
DC Crop ON switches back to 1.5 x focal length at 19.5MP.
This, however is only relevant on the sd Quattro H.
DC Crop On/Off. Shot with the 8-16mm F4.5-5.6 DC HSM.
The X3F format does not suffer from the limitation of the DNG when an image is shot in a different Aspect Ratio set in the camera. The user can always revert to the native 3:2 ratio regardless of what was used during the shoot.
The image quality out of conversion remains one of the best, so if you can live with some of the shortcomings (fewer by each updated version) and can accommodate this into your workflow, it is highly rewarding.
With the introduction of native DNG in-camera, it is now possible to profile the camera the easy way. There are various ways of making a profile for the camera, but by far the fastest and most convenient is to use the X-Rite ColorChecker Passport. The idea of profiling the camera may be new to many, but it is of paramount importance to photographers who need to shoot reference colors (pantone, paintwork, automotive, commercial, fashion, art reproduction, etc.) and ensuring that the camera is ‘calibrated’ (in post production) to capture accurate colors.
COLOR IS DEVICE DEPENDENT and is different from device to device on how they display those color information . The art and science of trying to get all these colors to work together in a common language is the process of color management. Monitors need calibration regardless of how good the out of factory specifications are. Printers need calibration so that the color response on individual paper is consistent. The camera profile is the missing puzzle.
To use the Colorchecker Passport, simply do the following:
Shoot the Color Chart under a reference light. For generic applications just place them in daylight (avoiding certain hours, overcast day) and take a shot of it in RAW file (DNG or other native formats)
Shot under reference light. Light used is a pair of Aputure LS 1/2W, with a CRI of 98 at 5100K.
Option: Convert the RAW file into DNG using Adobe’s DNG Converter tool (Ref: https://www.adobe.com/support/downloads/product.jsp?product=106&platform=Windows)
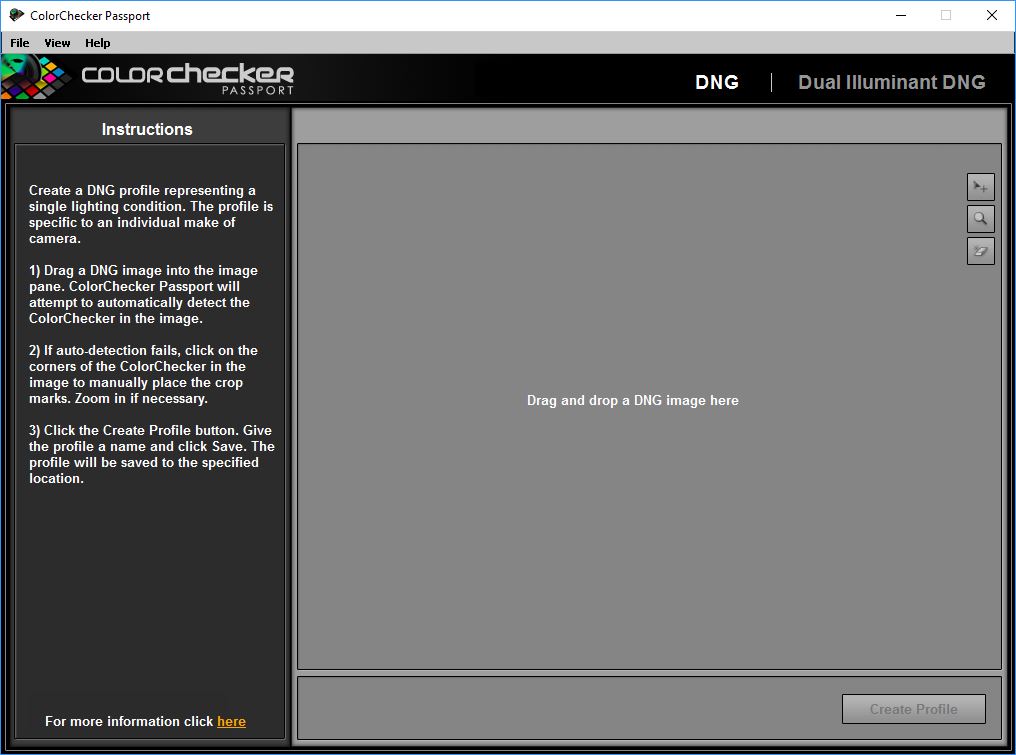
Install the ColorChecker Passport application (supports both Windows and Mac OS X).
Drag the DNG RAW file into the window:
In a few seconds, the application will automatically detect the color boxes it needs to perform the calibration. Click Create Profile.
Name the profile. By default I will just use the camera model, in this case ‘sd Quattro H’. You may want to specify is by lens if you wish to calibrate it separately.
Once it is done successfully, you will be greeted with a confirmation.
That’s all! The profile, proprietary to Adobe Suite in ‘dcp format’ will be placed in the proper folders for use application wide.
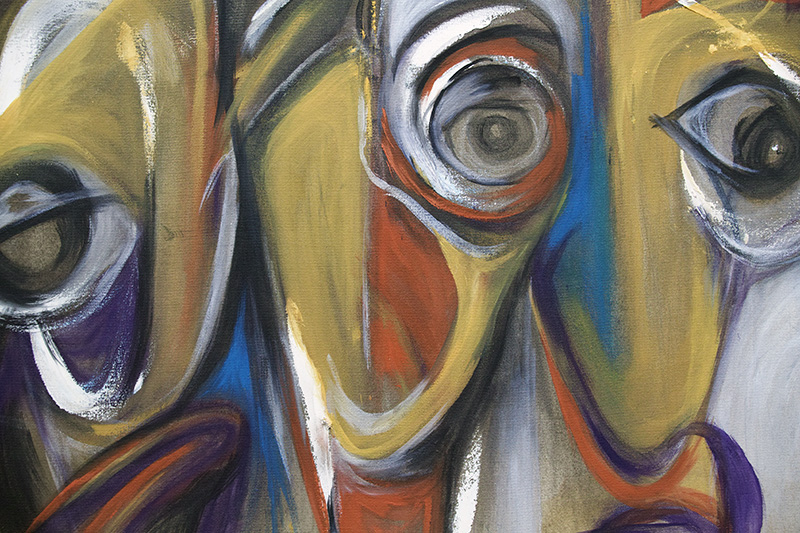
Since I am in the business of fine art printmaking and am offering art reproduction services, I shall use a painting to illustrate the effect, before and after calibration.
Shot with ambient lighting (Fluorescent,AWB, Neutral)
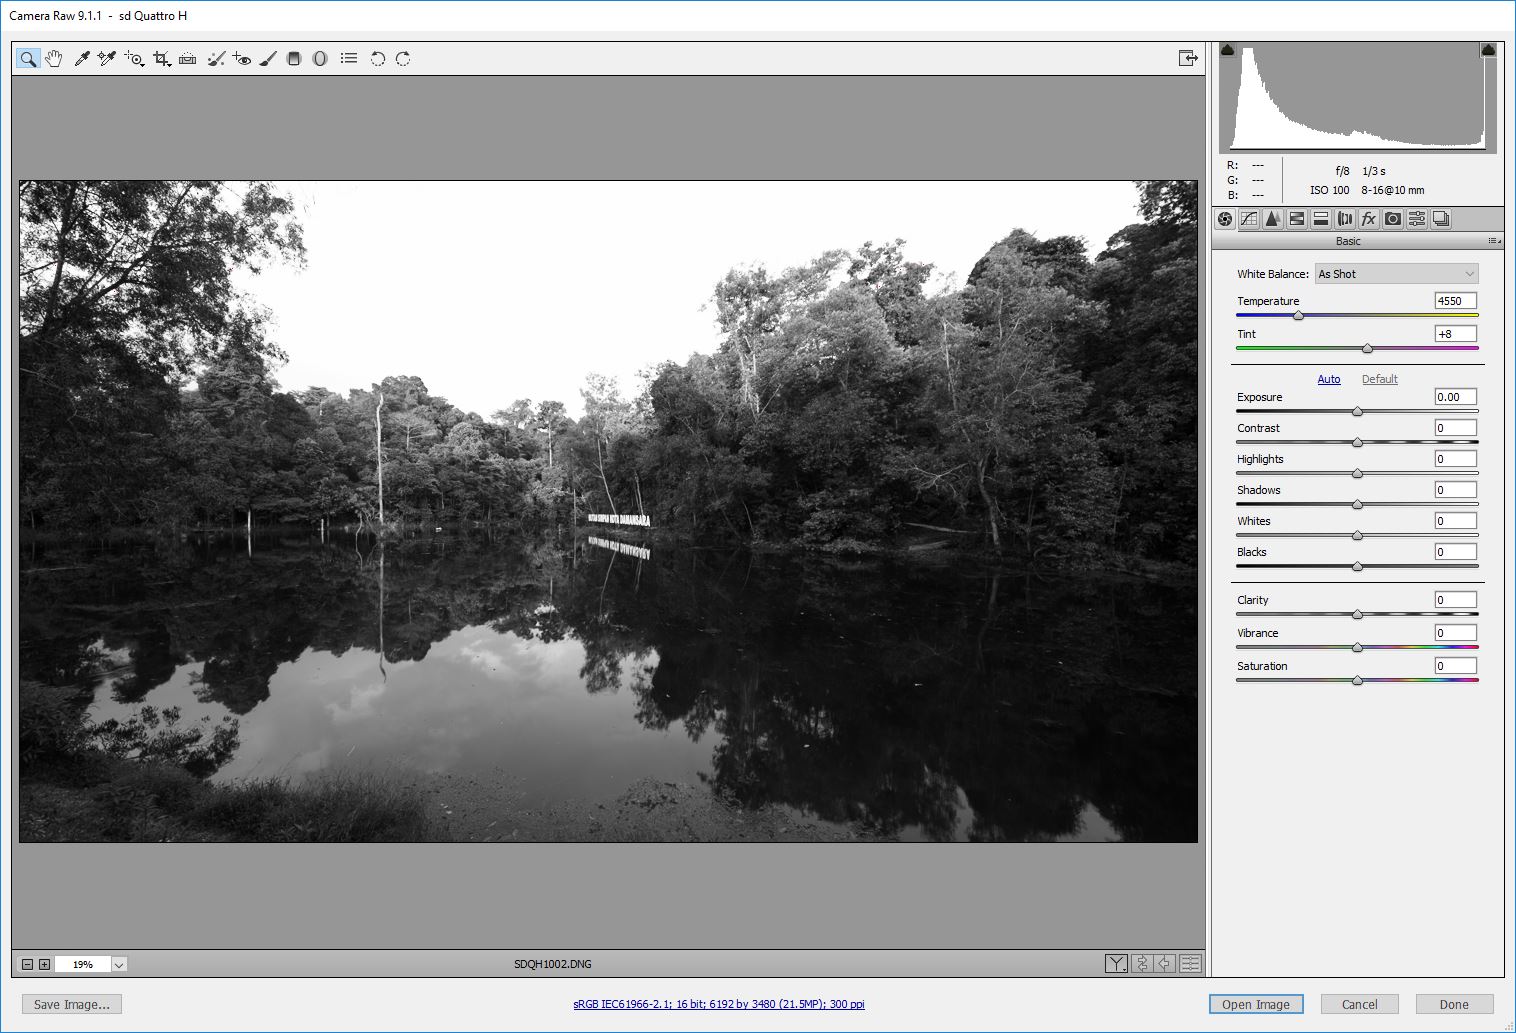
DNG file opened in Adobe Camera RAW, generic profile.
Final calibrated image with custom camera profile
The calibrated image is so close to the original work, with probably a small margin of error which is easily corrected with further specific adjustments. The sd Quattro H does offer unprecedented advantages in this area, with color depth and definition of details beyond any camera in the same class!
Final Note:
It is also very important to work on a wide gamut, high accuracy LCD. I am using the BenQ SW2700PT which has excellent specifications covering a high 100% sRGB, 99% Adobe RGB with support for DCI-P3 and even REC 709 at the touch of a button.
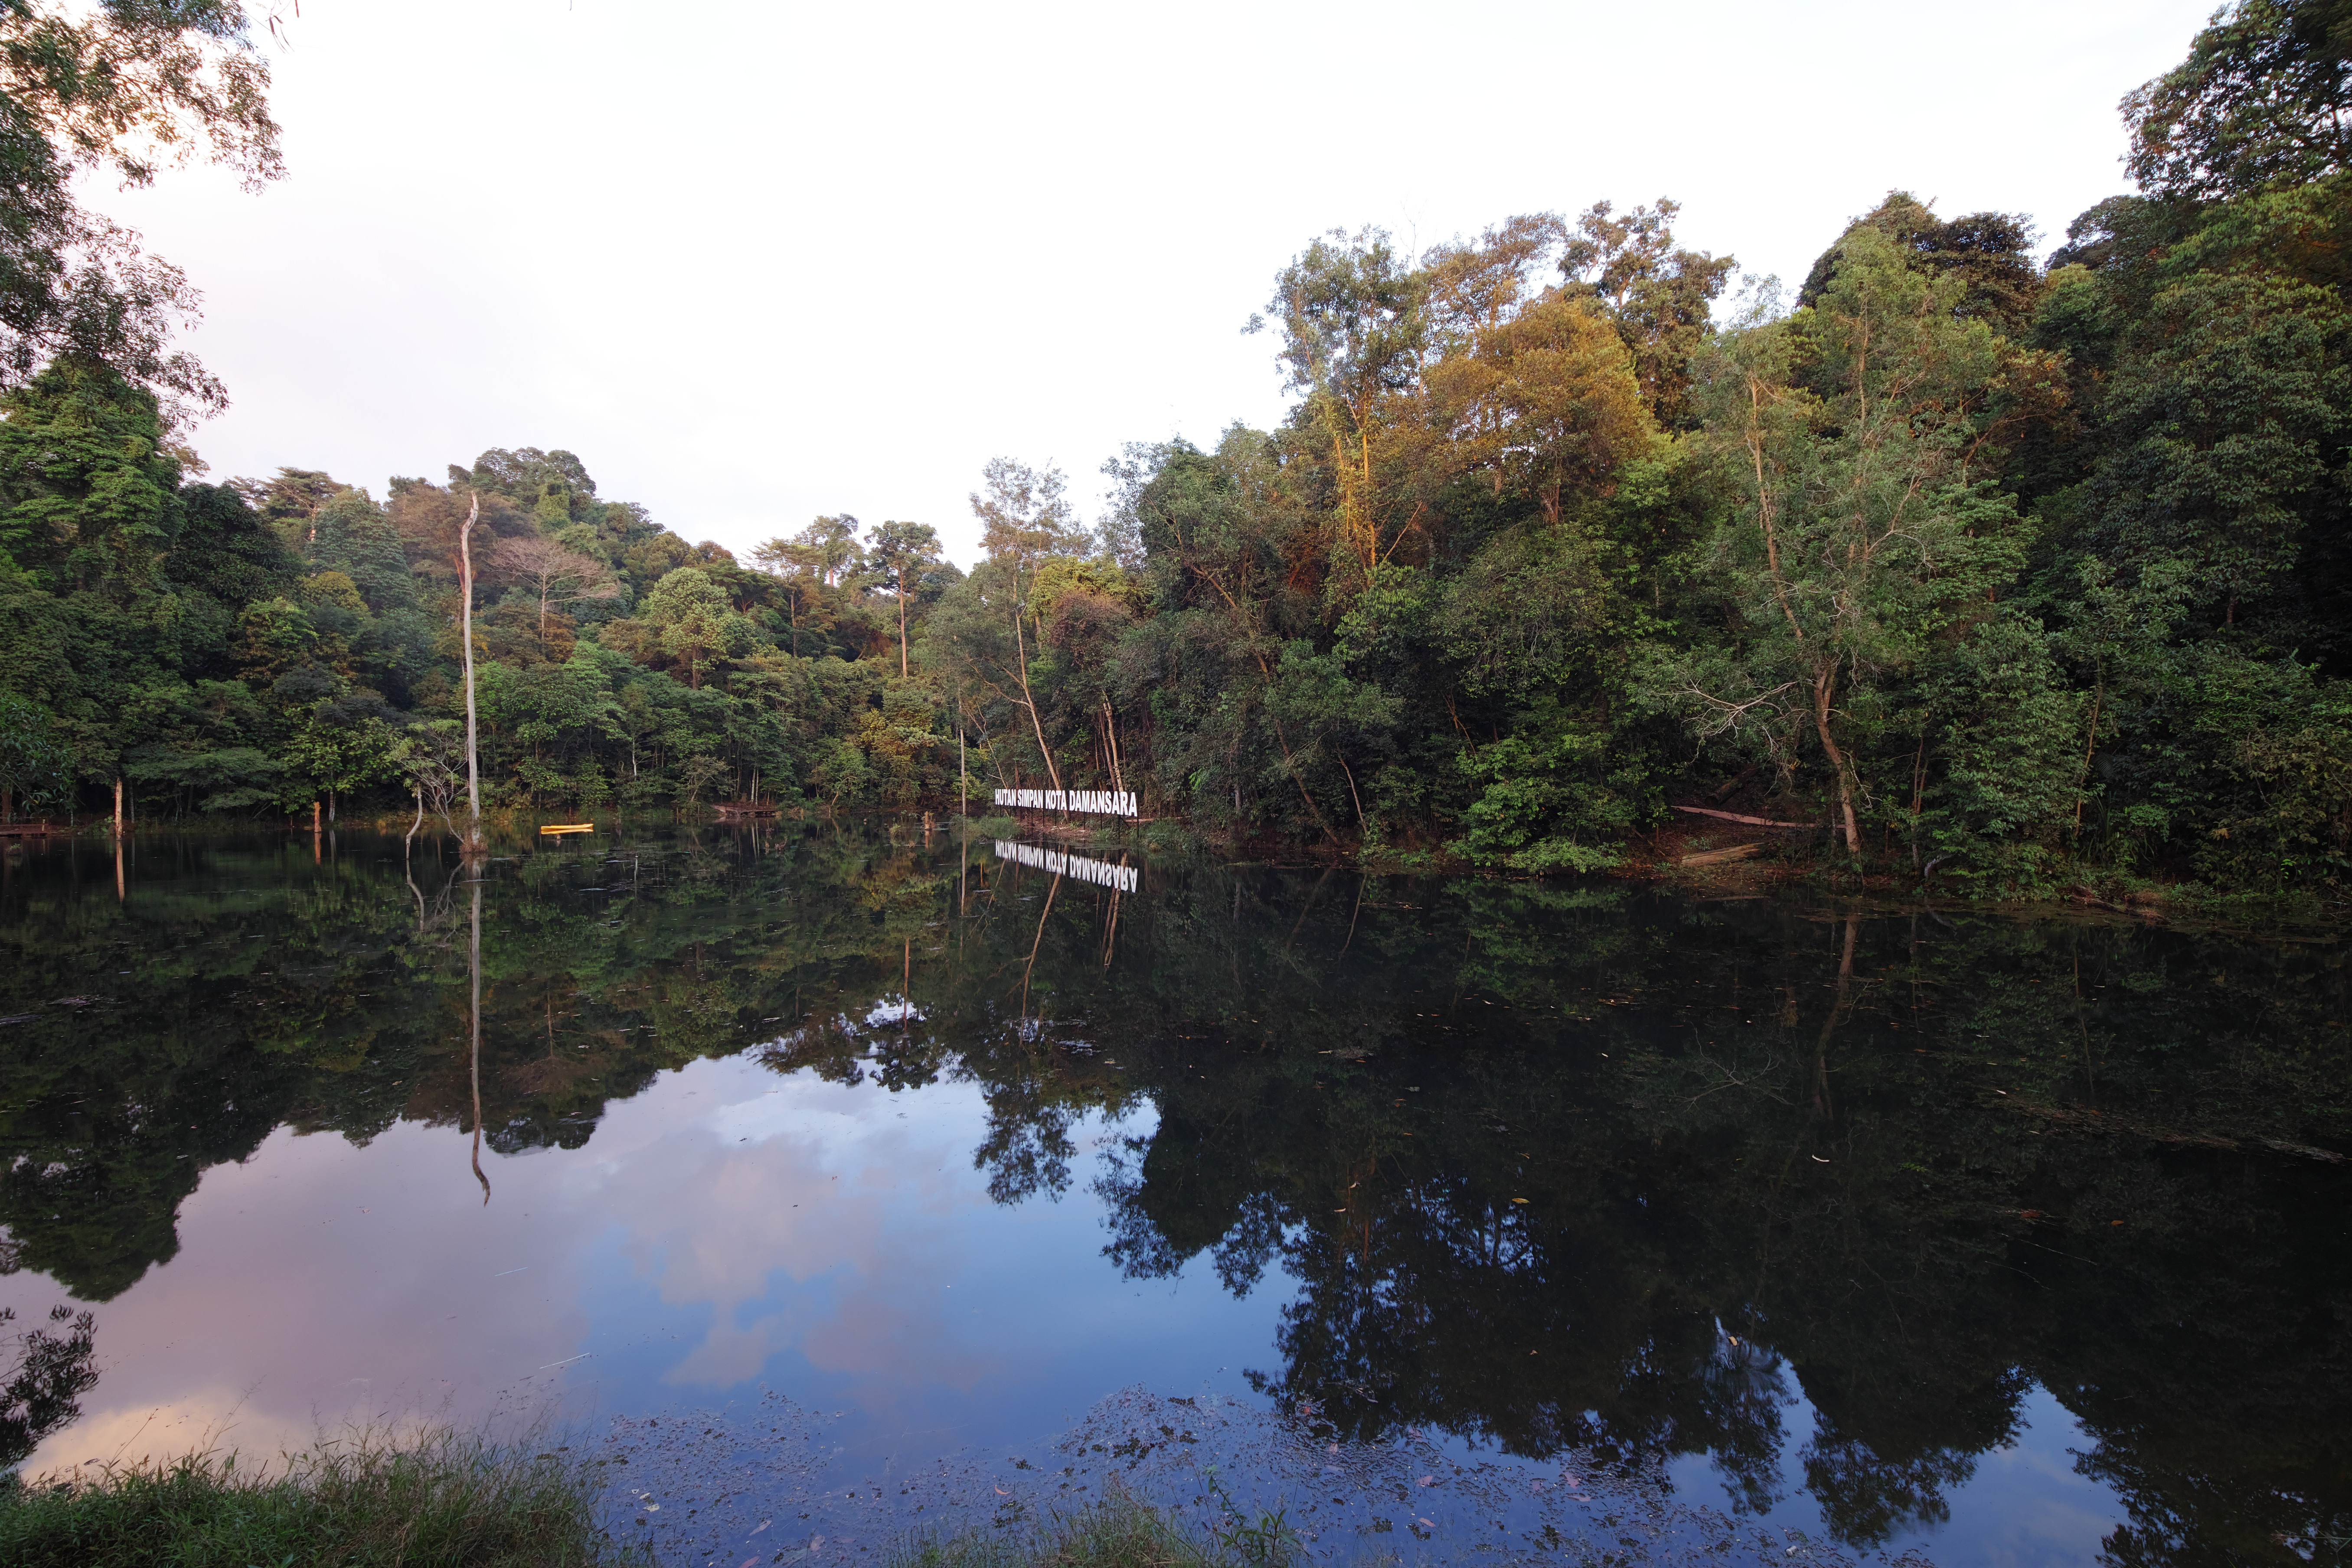
I have received numerous requests to post some RAW DNG images for scrutiny and quality checks. If you have not read my article on RAW DNG, you may want to start from there.
Here are some test shots, free for download although I must warn you about the file sizes. All images were taken with the 50-100mm F1.8 DC HSM | Art on the sd Quattro H with Crop Mode OFF. These images are not meant to be pleasing aesthetically but they represent a wide gamut of shooting conditions i.e. under/over-exposed and varying apertures (for those who wants to know how well this lens performs on the H). You are most encouraged to open the DNG files in different RAW converters and do your own comparisons.
(Please click on the image to download the DNG file.)
SDQH 1347 ISO 100 | F1.8 | 1/160s | 100mmSDQH1385 ISO 100 | F2.2 | 1/250s | 100mmSDQH1387 ISO100 | F1.8 | 1/3200s | 100mmSDQH1383 ISO 100 | F5.6 | 1/1250s | 69mmSDQH1392 ISO 100 | F2.5 | 1/3200s | 100mmSDQH1344 ISO 100 | F8.0 | 1/320s | 100mm
This mode was first introduced in the sd Quattro, and it promises lower noise, higher definition images by capturing 7 shots in different exposure (+/-2EV) and combining them into a RAW file in X3I format. As Sigma as rightly put it, it create noiseless images with an extensive dynamic range…or more commonly known as HDR. My first hand experience was not the best as there is no tolerance for anything that moves, not even a little. The jagged artifacts are almost impossible to retouch although the gain in dynamic range is very good.
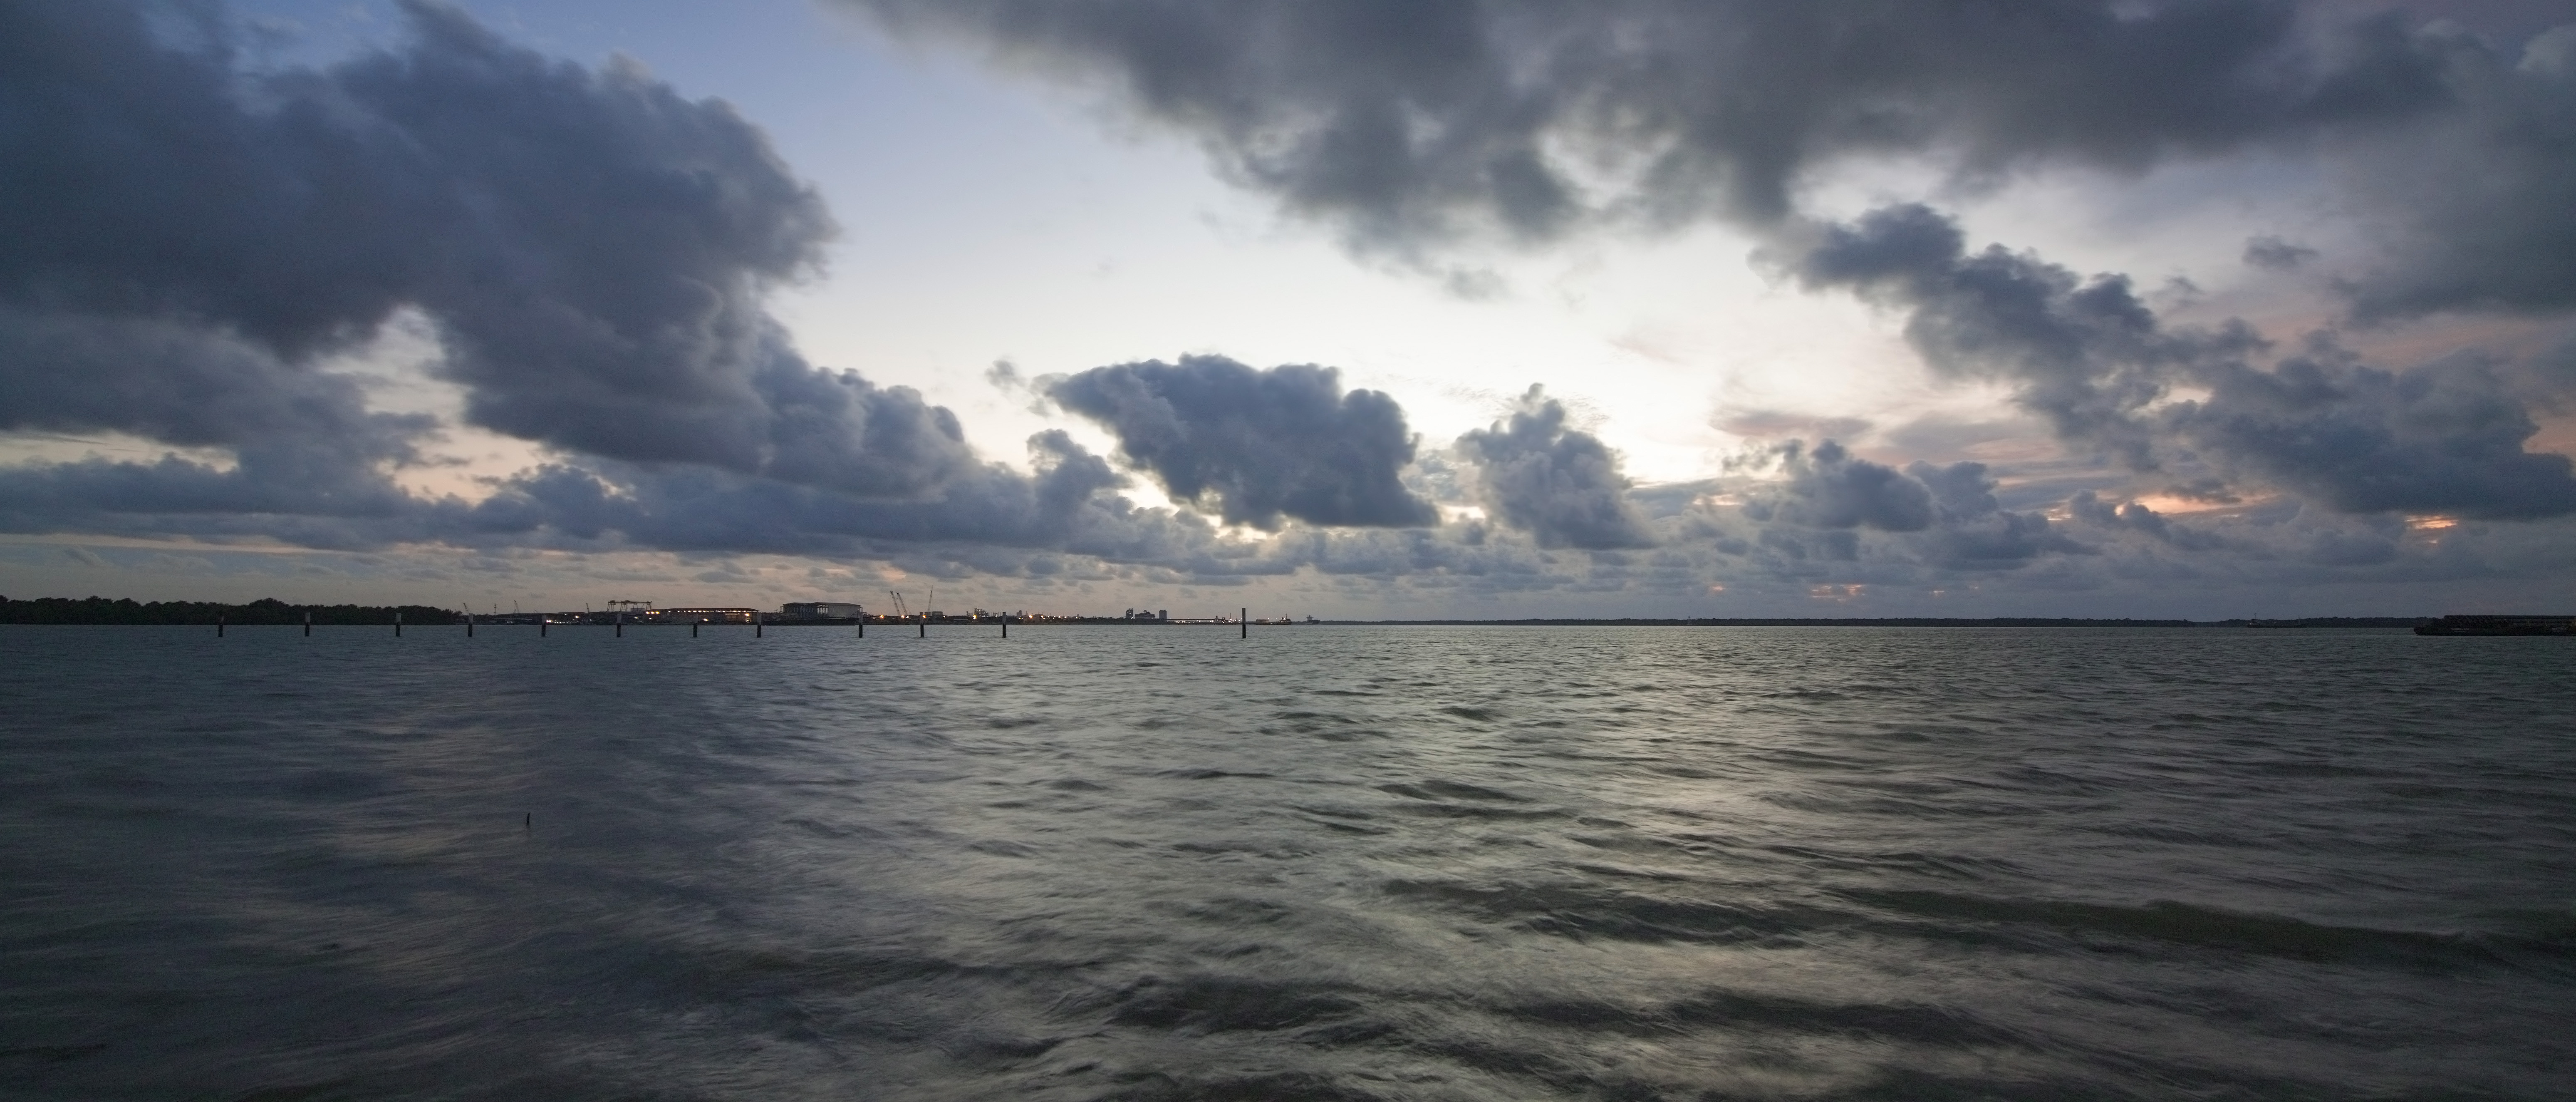
Enter Version 2.0. Much have been done to improve the quality and usability of this mode. In fact it is now almost practical to use it on moving objects. I did an acid test by shooting moving waves with it, and the result is astonishing! It is still not perfect as there are still some minor artifacts on the clouds, but largely the moving wave merged well without any requirement for retouching. If this can be further improved with some anti-ghosting software algorithm in Sigma Photo Pro, the SFD mode will definitely be a killer feature. As it is now, I am loving it already.
Visible artifacts on the clouds
A simple way is to blur off the artifacts using the Blur Tool in Photoshop to produce the final image based on my preferred color and contrast adjustments via ACR Filter.
Color & Contrast Adjustments in ACR Filter (Photoshop CC)
The final image
Shot with 18-35mm F1.8 DC HSM | Art in Super Fine Detail Mode.
Tips on shooting in SFD Mode:
Always use a stable tripod
For most shots, meter the exposure without any compensation unless deliberately required
Use a fast SD Card with at least 85MB/s write speed.
To improve the performance in SPP, turn on the GPU acceleration, run the files from a SSD if possible to speed up the I/O read/write.
Export the file in TIFF-16 for maximum editing headroom.
Don’t frown when you see a very flat image after the initial processing. Just color grade it and do the necessary contrast adjustments (very similar to a video editing workflow) in post (Adobe Lr/Ps or any other preferred software)
One of the main reason for the lack of acceptance of the Sigma camera is the inability to open and work on the RAW file outside of Sigma’s proprietary software, the Sigma Photo Pro. Based on numerous reviews and user feedback, the performance and stability of the Sigma software is highly questionable, especially on the Mac OS X. That said, the conversion quality is really second to none.
When I started using the camera, I had to change my workflow to accommodate the extra step needed to perform the RAW conversion. Users around the world have been asking for the universal RAW support via Adobe DNG to ease the workflow, and now Sigma has finally done it! Previously, an independent effort was initiated to code a small converter software to convert the X3F format to DNG, kudos to Roland Karlsson and highly dedicated team (Refer to this article at DPReview). When I met Mr Rudy Guttosch (VP, Foveon Inc. USA) in Shanghai back in March, he asked me if this (DNG) is really important….I said “YES!!!!!”. I don’t want to claim credit for this but we thanked Sigma for attentive to their customers’ needs and feedback. I believe the request was made for year, but in this case, it is better late than never.
The DNG support was incorporated into “H”. Sigma has stated that they will port this over to the sd Quattro and all dp Quattros through a firmware update although no specific date was given. Sigma implemented this as a 12-bit RAW DNG, which means it only has 4,096 levels of tonal resolution per channel. The native X3F is a 14-bit (total 16,384) RAW file which has approximately 4 times more information and tonal resolution.
Opening the DNG file is a standard affair as opening any other RAW files supported by Adobe. In this example, I opened it in Adobe Photoshop CC, and was greeted with the same Camera RAW dialog.
A point to note, when the user select a particular Color Mode and Aspect Ratio in the camera, the DNG file will be tagged with those information. For Color, you can still change it to other settings through Camera Profile in ACR (Adobe Camera Raw), but the aspect ratio is permanently set without any way to resort to the original ratio of 3:2. I have send my feedback to Sigma on this, and am waiting for their official reply. Given that this is a RAW file, it should be well….raw, and not half-cooked. Meanwhile, please take note of this behaviour if you chose to shoot in DNG. The native X3F file does allow you to change back to the original ratio in Sigma Photo Pro 6.5.
Color Profile selection is available on the 3rd tab from the right in ACRCreating a custom camera profile is now possible!
What is exciting about the DNG file is it provides an avenue to make a custom camera profile through tools like X-Rite ColorChecker Passport (ref: X-Rite). I will try to make one this week, weather permitting. Profiling the camera is often an overlooked process within the workflow…but it is also the hardest to make. A good camera profile increases color accuracy which is often mandatory for color critical work and applications like art reproduction and other copy work.
The 12-bit does limit the editing headroom, especially on highlight recovery. Shooting with ETTR can be a challenged. It is also not known if the dynamic range of the Foveon sensor has a non-linear relationship with the distribution of tonal resolution (bits) as in any other conventional sensor, but in my shooting experience even now my DNG test, the ability to recover shadow seems easier than highlight. My recommendation is to shoot with a slightly underexposed metering.
The benefit of using the DNG file in the Adobe workflow (ACR/Lightroom) is both speed and familiarity coupled with the ability to use far more advanced adjustment algorithms including shadow/highlight recover (to replac X3 Fill in SPP), Clarity, DeHaze (in CC), Lens Correction, better Chromatic Aberration and Noise Reduction adjustments, etc. Personally I am not a big fan of ACR for RAW conversion because there are better RAW converters out there but I must admit I enjoyed the ease of use and speed of editing the Adobe software provides especially in Lightroom. I have tried opening the DNG in Capture One 10; while the conversion quality is noticeable superior to ACR, I could not change the Color Mode (profile) of the image which means if the shot was taken in Mono, it will remain in Mono. Ditto for aspect ratio.
I was initially tempted to do a comparison between the X3F and DNG, but practically it makes no sense. My reason for not doing it is because those who don’t find fault in SPP and can accept it as it is (SPP 6.5 has improved in performance due to the GPU support) may continue to use SPP, but those who hated it will switch to DNG anyway. Also, did I mention that a color image in DNG is approximately 150MB each?! A monochrome file is approximately 100MB. It takes a longer time to write to the SD card compares to writing a X3F,
There is a quantitative and qualitative differences in each RAW file format, but each has its own value proposition and advantages. At the end, it has to fit into your workflow. I can work with either or both, at least know we have a CHOICE!
It came without surprise to many who know me as a strong advocate of Sigma cameras. I started using the dp Merrill back in 2013, which sets itself apart from other camera solutions as far as image quality is concern. The arrival of the dp Quattro changes the 1:1:1 3-layer sensor design to 4:1:1 which promises better image quality without sacrificing resolution and color definition. The sd Quattro arrived in early August, which addresses users’ need for an interchangeable lens mirrorless system which uses the same 19.5MP Foveon Quattro sensor as the dp Quattro. In February 2016, the sd Quattro was announced together with a higher end sd Quattro H camera body which sports a whopping 1.3x APS-H 25.5MP Foveon Quattro (4:1:1) sensor! No one has seen any sample images but after a 10-month long, the wait is finally over. The sd Quattro H is now available for sale in Japan and the rest of the world in weeks to come.
Image from Sigma Global website.
I am most fortunate to be given a production “H” just a few days before the official launch date. The “H” is largely the same as the “Q” externally except for the logo which differentiates them. Operationally both cameras are also the same including the user interface sans the newer features on the H.
The new sensor is slightly larger than the Q sensor, and it packs in a 30% increase in megapixels (6MP). The size of the pixel/sensel remains the same. Comparing the Q and H is not as straight forward because the focal length of each lens is now multiplied by a factor of 1.5X (Q) and 1.3X (H) respectively. The depth of field is also reduced on the H at a given aperture. It is closer to the rendition of a full frame camera, about half a stop.
For example, a 35mm lens produces a field of view of 52.5mm when used on the Q (1.5X), but it’s wider at 45.5mm on the H (1.3X). Similarly, the 50-100mm F1.8 DC HSM | Art becomes:
Q: 75mm to 150mm, F1.8
H: 65mm to 130mm F1.8
To make a fair comparison, one has to match BOTH the field of view ANDeffective aperture to gain a good understanding of the quantitative and qualitative differences between the Q and the H. Also, the H image file (6192 X 4128 pixels) will have to be downsampled to Q resolution (5424 X 3616 pixels) for a fair comparison. You will clearly noticed a remarkable difference in better rendering and resolution of diagonal lines and minute details on the H.
(Both images were taken from the same camera, one in DC Crop Mode to simulate the sd Quattro, and the other with the mode turned off. This is to ensure that the delay and framing between shots were mitigated or eliminated).
The increase in resolution results in better definition, separation and refinement in details which is apparent on print and display. This a clear advantage since the Foveon sensor is all about pursuing realism.
Shot with 8-16mm F4.5-5.6 DC HSM.
It is interesting to note that the image circle of the 8-16mm lens covers the APS-H sensor from 10mm onwards!
Shot with 50-100 F1.8 DC HSM | Art.
No problem using this lens with Crop Mode turned off.
Shot with 18-35 F1.8 DC HSM | Art.
The 18-35mm Art lens suffers from a degradation in corner sharpness without Crop Mode.
Shot with 18-35mm F1.8 DC HSM | Art in Super Fine Detail Mode.
Super Fine Detail (SFD) mode has been improved to reduce movement artifacts (with jagged edges). It seems to have an anti-ghosting algorithm to take care of those. It is now a lot more usable than before.
A 32″ wide print was made with this image, and the result is very impressive despite the fact that the corners of the image are soft when used without Crop Mode.
The support for DNG is the next big thing in my discussion in another blog entry together with the improvements in Sigma Photo Pro and Capture Pro. The improvements on the H shall be make available on the sd Quattro and the whole range of dp Quattros, as far as I was told.